
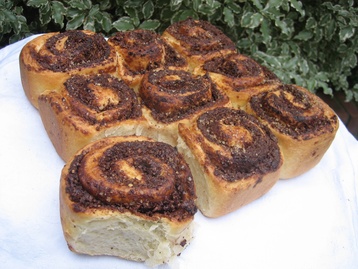
Chocolate and Hazelnut Buns

Ingredients
- 350 g strong white bread flour
- 1 sachet (1 ½ tsp) fast action dried yeast
- 10 g caster sugar (normal or golden)
- ½ tsp salt
- 55 g unsalted butter
- 1 egg
- 150 ml milk (I use semi-skimmed)
- 100 g hazelnuts (preferably with skins removed - see tip)
- 80 g caster sugar (normal or golden)
- 25 g cocoa powder (not drinking chocolate)
- 50 g unsalted butter (really soft - see tip)
- A little extra for greasing unsalted butter
- About 10 ml milk
- 2 tsp demerera sugar (optional)
Accompaniment
SponsoredLouis Jadot Macon Blanc - Featured BBC 2 What to eat now
Minerally, unoaked with lemon and apple fruit character, delicate and well balanced. Founded in 1859 this label has become the reliable stamp of quality and consistency. The Maconnais is located in the Southern part of Burgundy, close to the famous Cote d'Or a region ideal for growing Chardonnay. Buy this wine if you like: Chardonnay with mineral freshness and delicate friut.
Description
Don't be afraid of dough, as I used to be. These are really easy and so delicious, especially warm from the oven. Great any time, & a lovely treat for a weekend breakfast / brunch.
Method
-
1
Melt the butter in a small saucepan, adding the milk towards the end, just to warm through.
Sift the flour into a large bowl or the bowl of a mixer fitted with a dough hook.
Stir in the yeast, sugar and salt.
Lightly beat the egg.
When the milk is luke-warm (if you have a thermometer you can check that it is about 40 degrees C - if it is too hot it may kill the yeast), pour into the bowl, along with the egg.
Either mix together, bring into a dough and knead by hand for about 10 minutes until smooth and stretchy, or mix with the dough hook for 10 minutes.
Lightly grease the bowl with a little butter, put the ball of dough back in the bowl, cover with cling film and leave in a warm place for about 1 ½ - 1 ¾ hours, until roughly doubled in size.
To make the filling, blitz the hazelnuts, sugar and cocoa in a food processor (this quantity just fits in the mini chopper that came with my stick blender).
Knock back the dough (punch or prod with your fingers!) and knead, by hand or with the dough hook, for a couple of minutes until smooth again.
Lightly flour the work-surface, or put the dough on a sheet of baking paper, and roll out until you have a roughly rectangular shape approximately 30 X 40 cm (it is quite a springy dough so will take a few times to get to it keep flat).
Spread the soft butter evenly over the dough, leaving a 1 cm gap around each edge.
Scatter the filling evenly over the butter. From the longest edge, roll up the dough and trim the ends so that the roll is 36 cm and can be cut into 9 X 4cm pieces.
Grease a 20cm square tin with butter and line with baking paper (to help lift them out easily use one piece that covers the bottom and 2 sides, with a little overhang over the edge).
Put the 9 slices into the tin in 3 rows, spaced equally apart. Some of the filling may fall out when you lift them into the tin - if you lose a lot, just sprinkle it over the tops of the rolls in the tin. The ends can be used to make mini rolls with any filling that spills out of the rolls when you lift them into the tin – cook’s perks! – simply place on a greased / lined baking tray.
Cover loosely with lightly buttered cling film and leave to rise again in a warm place, for 45 minutes to an hour, until they have risen again and the ones in the square tin are nestled snugly together, without any gaps.
Pre-heat the oven to 180 degrees C. Remove the cling film. Brush the tops with a little milk and, if you like, sprinkle with a little demerera sugar for a crunchy top. Bake for 25 minutes until golden brown and skewer comes out clean. Leave in the tin for 5 minutes, then turn out onto a wire rack. Eat warm or cool, breaking apart only when ready to eat, to keep the edges soft.
Best eaten on the day they are baked, but will keep for one day in an airtight tin, once cooled completely. (If you are eating one on the second day, I think it is best warmed slightly in the oven - e.g. 180 degrees C for 5 to 10 minutes).
Chef's Tips
If your hazelnuts have skins on, put them on a baking tray and roast in a hot oven (200 degrees C) for 8 - 10 minutes, then tip the hot nuts into a clean tea towel and rub to remove the skins. Most should come off easily, and a few stubborn bits aren't a problem.
If you forget to take the butter out of the fridge (as I always do), weigh out the 50g, chop into rough cubes, then put them on a plate. Fill a glass bowl with boiling water, then tip the water out and cover the butter with the bowl. You can also leave the butter next to the dough while rising.
In winter, I put the bowl of dough on a chair next to a warm radiator, with a towel draped from the radiator over the bowl. For extra warmth, if you have a feather-filled winter jacket, I can recommend it!
If serving straight way, wrap in a clean cloth to keep warm for longer.
If you want to serve these for breakfast, you can make the dough the evening before, and let it do its second rise slowly in the fridge overnight. In the morning, take the tin out of the fridge 30 minutes (or up to an hour if you want to go back to bed!) before you bake them, to allow them to come to room temperature, then bake as above.
If you have problems with the dough rising (although you shouldn't if you follow the steps above), see the tips on my recipe for teacakes.
Similar Recipes
View all similar



Comments (0)